By Saskia | April 28, 2019
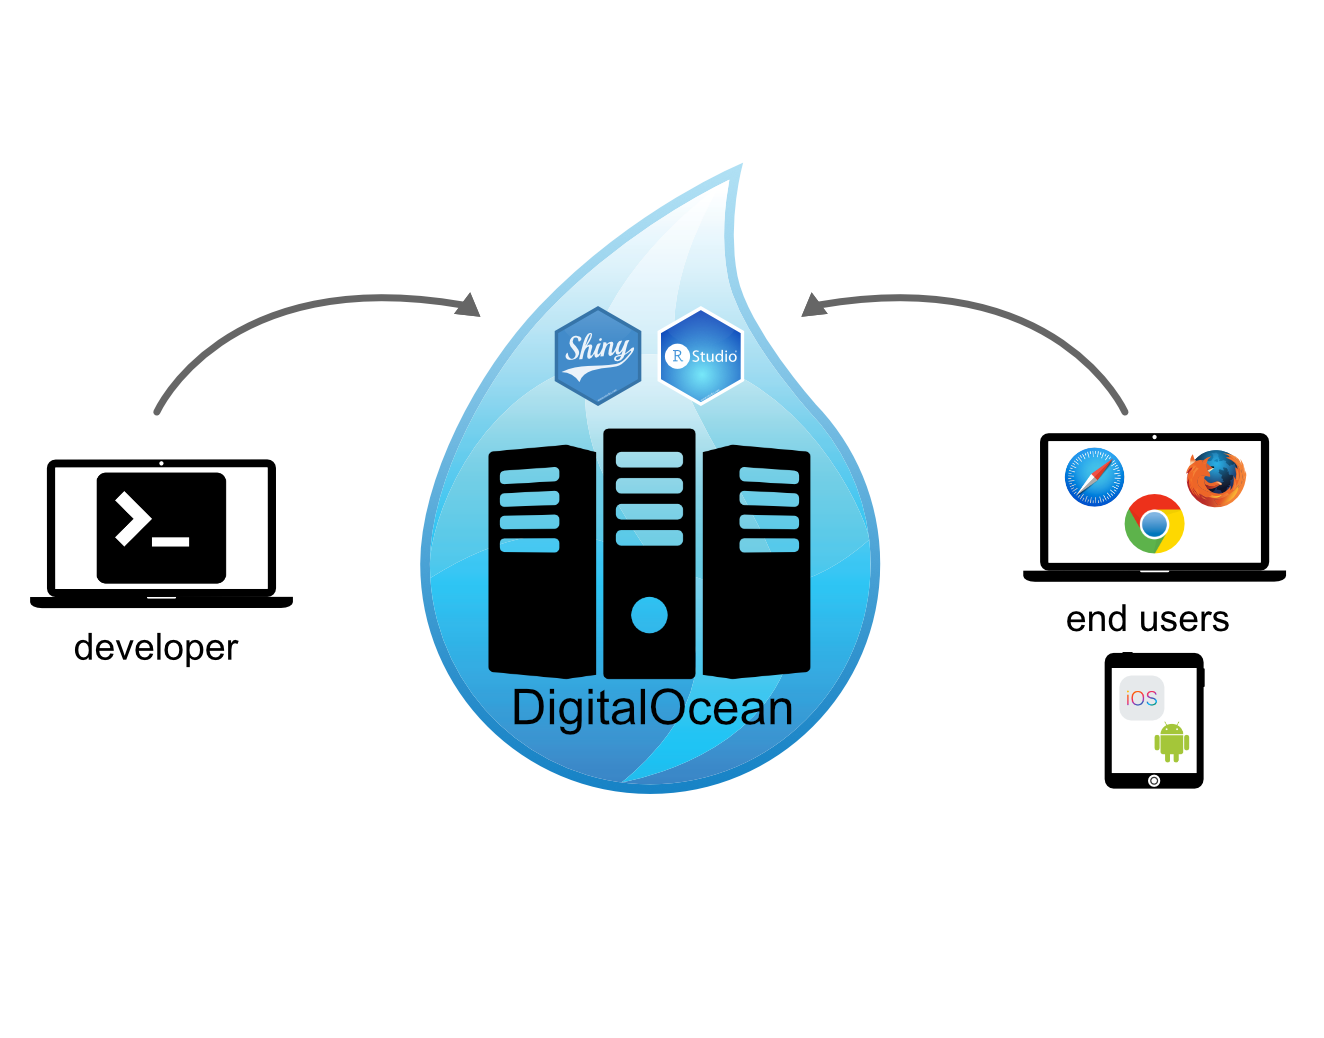
Do you also like shiny apps and would like to host more than 5 apps as currently permitted at shinyapps.io? Than the solution might be to run your own shiny server using any (virtual) server. In the following I will describe step-by-step how I set up my own Shiny as well as Rstudio Server using Digital Ocean.
At the university I already use Rstudio Server extensively in my stats courses, which runs on a physical server at my research institute. Since I like to use shiny apps for demonstrating various statistical concepts, I wanted to host my own Shiny Server but using a virtual server to be more independent: https://saskiaotto.de/shiny/.
To help you saving yourself a headchache and time collecting all the required information but also for my future self I decided to write this beginner guide. The first part will cover how to set up a DigitalOcean server or droplet including adding SSH connection, SSL certificates, firewalls, a web browser and custom domain. In the 2nd part I will describe how to install R, RStudio and the Shiny Server.
Table of Contents - Part 1
- Step 1: Setting up a virtual server using Digital Ocean
- Step 2: Add SSH keys (optional)
- Step 3: Set up a basic firewall (optional)
- Step 4: Add more security by changing the default port (optional)
- Step 5: Make your droplet visible
- Step 6: Add a custom domain name (optional)
- Step 7: Add a SSL certificate to your HTTP to get HTTPS (optional)
Step 1: Setting up a virtual server using Digital Ocean
For Shiny and RStudio Server you could either use a physical or virtual server with Linux as the typical operating system. However, the virtual server can be a more cost-effective solution with easier maintenance and better scalability and portability. With the rise of cloud hosting services like Amazon Web Services (AWS), Google Cloud, Microsoft Azure and Linod, setting up your own virtual machine has also become easier than ever before.
DigitalOcean (DO) is such a cloud service platforms that offers database and object storage, scalable compute services and networking and developing tools. DigitalOcean has quite a good pricing and provides an easy and quick way to set up affordable Linux instances (called droplets), which is why I went for that platform.
1.1 Sign up
Before you can start setting up your own droplet, you need to sign up for an account by visiting this sign up page where you can choose between entering your email address, which you need to verify in a second step, and a password or using Google Single Sign-On.
After that you are asked to manually charge your credit card by using the Pay now button on your billing page. It’s pretty simple and only takes a few minutes to create a single droplet and its Linux distribution. Once the droplet is created you will be charged for it by the hour. That means if you decide to delete it right after its creation you won’t be charged anything.
1.2 Create a droplet
- From the Create menu in the top right of the control panel, click Droplets.
- Under Choose an image select the Linux distribution (Ubuntu, Fedora, Debian, and CentOS are supported) you like to have, in my case I chose the default Ubuntu 16.04.6 x64.
- DigitalOcean offers three kinds of Droplet plans, a standard plan and two performance plans, but the former should be sufficient for our Shiny Server.
- Choose a size for your Droplet, which determines its RAM, disk space, and vCPUs as well as its price. For the moment the smallest machine (5$ per month / 0.007$ per hour) should be sufficient.
- Leave the Add backups and Add block storage options out.
- Now choose the location of the datacenter. This should be preferably close to your own location for fast connection.
- If you want to connect using an SSH key - which I highly recommend - you can already add the public SSH key at this stage (simply click on New SSH Key) or do this later as I will show you.
- Finally choose a hostname for your droplet and click the Create button.
You’re all set now and should soon receive an email from DO containing your Droplet’s
- hostname,
- IP address, which will be something like 123.45.678.910,
- the username
root, which is the default username on most operating systems, - a password to login if you haven’t provided an SSH key in step 1.2.7.
1.3 Connect to your droplet as root
Typically, servers do not have any graphical user interface (GUI) and you need to log into it through the terminal.
One way is to do this from the DigitalOcean GUI when logged into your account, but this option will be pretty slow. If you wanna give it a try, click on your droplet and open the tab Access. Here click the Launch Console button.
Alternatively, connect to your droplet straight from your computer through a SSH client. OpenSSH is such a client that is already included on OS X and Linux. But if you are a Windows user you should download the SSH tool PuTTY and follow these DigitalOcean instructions.
So if you have a Mac or use Linux just open the Terminal program and type into the console the following ssh command:
$ ssh 123.45.678.910 -l root123.45.678.910 is just a dummy IP address here (which I will use more often in this tutorial). Replace it with your own droplet’s IP address given in the email. The -l flag stands for the login name, which is for now root. You need to provide the username with which to log in, otherwise your computer will try to log in under the user you are currently on your machine. And that name does not exist in your droplet.
An alternative command which works the same is:
$ ssh root@123.45.678.910(You will find this notation in the DigitalOcean instructions)
Since your server is not yet identified in your local computer you will be asked the first time you connect if you’re sure you want to continue connecting. Once you type yes and press ENTER you’ll receive a confirmation that a host key fingerprint was saved to your local machine.
Now you’re asked for the password send by email → simply copy and paste it from your email and press ENTER. Next, you should follow the steps to change the password to something you can remember.
If nothing went wrong you should see in the terminal
root@hostname: ~$which indicates that you successfully logged into your new droplet!
1.4 Create a non-root user with sudo rights
DigitalOcean recommends that the droplets are run by a non-root user that have admin access to avoid any accidents as root user. So right after logging into my droplet I immediately created the user saskia and gave saskia sudo rights. I followed hereby this tutorial at DigitalOcean
$ adduser usernameReplace username with any name you want.
Set a new password and confirm:
Enter new UNIX password:
Retype new UNIX password:
passwd: password updated successfully
If you want to you can add some user info, otherwise press ENTER and then yes:
Changing the user information for username
Enter the new value, or press ENTER for the default
    Full Name []:
    Room Number []:
    Work Phone []:
    Home Phone []:
    Other []:
Is the information correct? [Y/n]
Next, we give the new user sudo rights by adding the user to the sudo group
$ usermod -a -G sudo usernameThe usermod command modifies the system account files to reflect the changes that are specified on the command line.
Here, it is critical that you add the -a. If the -a option is omitted in the usermod command above, the user is removed from all groups not listed (i.e. the user will be a member only of the sudo group). The -G flag should be always followed by the group name and indicates that the ‘sudo’ group will be the users secondary group.
Alternatively, gpasswd may be used:
$ gpasswd -a saskia sudoThe gpasswd command is used to administer the files /etc/group (contains group information), and /etc/gshadow (contains secure group information). Using it with the flag -a means that the user becomes a member of the group ‘sudo’ but also the group administrator.
You can get a list of all groups the user is a member of and a list of all groups in the system with these 2 commands:
$ id username
$ groupmod <HIT TAB 3 TIMES>
Test the sudo access on your new user account by switching the user with the su command
$ su - usernameSince the new user has sudo privileges now, the following command should allow you to see the contents of the /root directory:
$ sudo ls -la /root(The first time you use sudo in a session, you will be prompted for the user’s password).
To leave the new sudo user and get back to using the root profile, type exit or
$ su - rootFrom now on you will be able to log in directly as the new user instead of root. Try it out: type exit to exit the server and log in as new user:
$ exit
$ ssh username@your_droplet_IP
Avoid using the root user once you have set up a sudo user!
Step 2: Add SSH keys (optional)
We could have added the keys right at the beginning when creating our droplet. But at the time I started with my first droplet I didn’t know how to do this for all my computer so I added them later. Since it is also a bit more complicated to add the keys after you’ll get to see at least all steps required:
2.1 Creating individual keys for each of your computers
I need to access my server from both my work and home machines so I created for individual keys (from within the respective machine). On my work Mac I opened the terminal and typed (NOTE: I was not logged into the droplet!)
$ ssh-keygen -t RSA -b 4096 -C "work machine"The -C flag allowed me to add a comment where I could specify that this key will be for my work machine.
Next, I was asked to specify a file name and location. I could have simply accepted what was suggested by pressing ENTER. But instead of using the default file name ‘id_rsa’, I named the file ‘digitalocean-rsa’ since I also want to use different keys for different connections. But I used the same /.ssh directory as suggested.
I was then asked for a passphrase, which adds more security in case the computer gets stolen. So for my work machine I added a passphrase, but on my home machine later I left it blank and just pressed ENTER.
When setting up later a SSH key also in my home machine, I specified in the comment that this key will refer to my “home machine” and named the key file also ‘digitalocean-rsa’. This is not a problem as the public key will anyway not exist on the remote server as an individual file. Instead, the content will be added to the authorized_keys file → here the comment becomes important since it will show up as the last line of code per key.
If you want to get more details about the above steps take a look at my other blog post on linking 2 computers to 2 github accounts using SSH keys.
2.2 Copy the public keys to the droplet’s root account
If the SSH keys generated above are not added when creating the droplet one needs to code a bit more in the terminal to place the public keys in the right directory of the root account. In the remote machine is the file /root/.ssh/authorized_keys where we need to insert the public keys.
Method 1: ssh-copy-id
This is probably the most painless solutions. Just open another terminal window with e.g. cmd+N and go to .ssh folder of your local machine (the folder is often hidden: under Mac/Linux you’ll find it right in the user’s home director ~/.ssh). Copy the public key file to the root account with the ssh-copy-id command
$ cd path/to/.ssh
$ ssh-copy-id -i digitalocean-rsa.pub root@droplet_IP
and type in your user’s password when prompted.
Method 2: Manual insertion
If you don’t have ssh-copy-id installed you can also manually copy and paste the key:
Open another terminal window and go to .ssh folder of your local machine. Cat out your key file and just copy the output (the public key starts always with ‘ssh-rsa’):
$ cd ~/.ssh
$ cat digitalocean-rsa.pub
ssh-rsa EXAMPLEzaC1yc2EAAA...
Go to the first terminal window where you are logged into your droplet as root and open the authorized_keys file with your preferred editor (I use nano for this):
$ nano /root/.ssh/authorized_keysPaste the contents of your SSH key into the file by right-clicking in your terminal and choosing Paste or by using a keyboard shortcut like cmd+V. Then, save and close the file. In nano, save by pressing ctrl+O and then ENTER, and exit by pressing ctrl+X.
2.3 Add a copy of your local public key to the new user’s account
Before we log out, we need to add our SSH keys also to our new user’s account. So far only the root account has the SSH keys (this would be also the case if you added the keys right at the start when creating your droplet). But to be able to log in successfully as non-root user saskia I need to have the public keys also in an authorized_keys file in the home directory of saskia (i.e. at /home/saskia/.ssh/).
The simplest way to copy the files with the correct ownership and permissions is with the rsync command:
$ rsync --archive --chown=saskia:saskia ~/.ssh /home/saskia(Replace here my username saskia with your own)
2.4 Modify the SSH server configuration
Before you can test whether you successfully implemented the SSH connection so that you don’t need your password anymore when logging in, we need to deactivate the password authentication in the SSH server configuration file. Open the sshd_config file in the /etc/ssh/directory (of your droplet) with an editor:
$ sudo nano /etc/ssh/sshd_config(requires user password)
Look for line:
# Change to no to disable tunnelled clear text passwords
PasswordAuthentication yes
→ The default is ‘yes’ but we will change this to ‘no’.
Save and exit the editor.
Now restart the SSH client (under Ubuntu use ssh and not sshd):
$ /etc/init.d/ssh restart
# or
$ service ssh restart
(confirm with password)
If you log out of the server you might not be able to log in again because you need to change also the SSH configuration file on each of your computers.
2.5 Edit the local SSH config file
Open the SSH config file of your local machine with an editor. The file should be located in the .ssh folder as your SSH keys, but if it does not yet exist, create it yourself with the touch command:
$ cd path/to/.ssh
$ touch config
$ nano config
Add the following specifications for your droplet
Host hostalias
    HostName 123.45.678.910
    User username
    IdentityFile ~/.ssh/digitalocean-rsa
Replace the ‘hostalias’ with any name you like for your droplet. This can be the name you specified when creating the droplet or another. I suggest to keep it simple since you can use this alias instead of the IP address when logging in. Replace also the dummy IP address with your droplet’s IP address, the ‘username’ with the name of your non-root user (in my case saskia), and the name of the SSH key file (if you have named it differently than me).
Save and exit.
Test your SSH connection by using your new log in credentials:
$ ssh username@hostaliasInstead of the IP address you can now use the host alias after the @ sign. You should not be asked anymore for your password. Only if you’ve set a passphrase for your key, you will be prompted to provide it.
If you want to know more about SSH configuration settings, a good tutorial is available on the DigitalOcean website: https://www.digitalocean.com/community/tutorials/how-to-configure-custom-connection-options-for-your-ssh-client
Step 3: Set up a basic firewall (optional)
Ubuntu comes with a default firewall configuration tool called ‘Uncomplicated Firewall’ (UFW) that makes sure only connections to certain services are allowed.
3.1 Enable and disable the firewall
To turn UFW on with the default set of rules:
$ sudo ufw enableType y and press ENTER to proceed.
To check the status of UFW:
$ sudo ufw status verboseThe output should be like this:
username@hostalias:~$ sudo ufw status verbose
[sudo] password for username:
Status: active
Logging: on (low)
Default: deny (incoming), allow (outgoing)
New profiles: skip
username@hostalias:~$
To disable UFW use:
$ sudo ufw disable3.2 Add SSH service
You can also allow or deny specific services by name since UFW reads from /etc/services. To see the list of available services type
$ less /etc/servicesAllow by service name
$ sudo ufw allow <service name>Some applications can register their profiles with UFW upon installation, which allows UFW to manage these applications by name. You can get the list of applications by typing
$ sudo ufw app list
Available applications:
  OpenSSH
You’ll see that OpenSSH, the service allowing us to connect to our server now, has a profile registered with UFW. We can now let the firewall allow SSH connections via OpenSSH so that we can log back in next time:
$ sudo ufw allow OpenSSHIf you look again at the status
$ sudo ufw statusyou should see this:
Status: active

To                         Action      From
--                         ------      ----
OpenSSH                    ALLOW       Anywhere
OpenSSH (v6)               ALLOW       Anywhere (v6)
If you want to know more about UFW, this is a good read: https://help.ubuntu.com/community/UFW
Step 4: Add more security by changing the default port (optional)
Some recommend to change the default port 22 to any other number that is not used already. I did this first but than ran into the problem that I couldn’t log into my droplet from the terminal anymore. Luckily, I was able to access it from the launch console in the DigitalOcean GUI. But it took me some time to realize that it was a firewall issue and that my custom port was not open. Custom ports need to be manually opened in the firewall but then I read that firewall modifications are really critical and any bad firewall rule can mess up the working of the entire server. So I switched back to the default 22 port.
But in case you’re still interested in how to change the port - e.g. because you rather want to switch off the firewall than keep the default port-, here is a short description:
Open again the SSH server config file with an editor:
$ sudo nano /etc/ssh/sshd_configGot to line 4 where you see ‘Port 22’ and change it to ‘Port XXXXX’ (choose a number - but check before in the internet if that is already used). Save and exit.
Now restart SSH client again and confirm with your password:
$ service ssh restartThe new port needs to be also added to the SSH config file at your local machine. Log out of the server (or open a new terminal window) and open the local config file:
$ nano path/to/.ssh/configAdd the port number (replace the XXXXX) after the last row:
Host hostalias
    HostName 123.45.678.910
    User username
    IdentityFile ~/.ssh/digitalocean-rsa
    Port XXXXX
If you connect more than one computer, change also the config files of your other machines!
Step 5: Make your droplet visible
5.1 Install nginx
To be able to show content to the public using the Hypertext Transfer Protocol (HTTP) your droplet needs a web server to be installed. The two most popular web servers are Apache and nginx and both would be similarly suitable. I went for nginx which is said to be a bit more resource-friendly and followed the instructions given by DigitalOcean.
You can see what the installation does by calling your IP address in your web browser before and after the installation. Visit http://123.45.678.910 in your web browser (replace this dummy IP with your own server’s public IP). You should see an error page saying that your browser cannot open this website.
Now in the terminal, log into your droplet as non-root user and type
$ sudo apt-get updateThis calls Ubuntu’s package manager (the Advanced Package Tool or APT in short) and updates the local package index to get the most recent package listing.
Next, we install nginx and any required dependencies with
$ sudo apt-get -y install nginxThe -y flag stands for the configuration option ‘Automatic yes to prompts’. So ‘yes’ as answer to all prompts is assumed and the installation will run non-interactively. Don’t be surprised if you don’t see this flag in later installations.
5.2 Adjust the firewall
Before we can test nginx, we need to reconfigure our UFW to allow access to this service. Similar to OpenSSH, nginx registers itself as a service with UWF upon installation so you will see it listed when typing:
$ sudo ufw app list
Available applications:
  Nginx Full
  Nginx HTTP
  Nginx HTTPS
  OpenSSH
The 3 nginx profiles stand for:
- Nginx HTTP: This profile opens only port 80 (normal, unencrypted web traffic)
- Nginx HTTPS: This profile opens only port 443 (TLS/SSL encrypted traffic)
- Nginx Full: This profile opens both port 80 and 443
Usually it is recommended to enable only the most restrictive profile, which would be for now Nginx HTTP as we haven’t added yet the SSL certificate.
$ sudo ufw allow 'Nginx HTTP'Check your new status with
$ sudo ufw statusYou should see this
Status: active

To                         Action      From
--                         ------      ----
OpenSSH                    ALLOW       Anywhere
Nginx HTTP                 ALLOW       Anywhere
OpenSSH (v6)               ALLOW       Anywhere (v6)
Nginx HTTP (v6)            ALLOW       Anywhere (v6)
Now check again your browser and refresh your page. You should see a ‘Welcome to nginx!’ message.
5.3 Modify the welcome page
Now that your web server is up and running, we should personalize the nginx landing page. After the installation you’ll see a new folder nginx in the /etc directory containing all configuration files including nginx.conf. But all web content is served out of the /var/www/html directory, which by default only contains the nginx landing page index.nginx-debian.html. If you want to change what the webpage shows you need to edit this html file with the sudo command.
$ sudo nano /var/www/html/index.nginx-debian.htmlNote that this is only recommended if you will link one domain to your server as we’ll do. In the case of hosting more than one domain off a single server OceanDigital suggests to use nginx server block files to keep the default as is. Here is a link how to do this: https://www.digitalocean.com/community/tutorials/how-to-set-up-nginx-server-blocks-virtual-hosts-on-ubuntu-16-04
Once you edited the HTML file, you will be able to see the changes immediately when you refresh the page in your browser. If you make changes in the nginx configuration file, you need to restart nginx with:
$ sudo service nginx restartA short digression into HTML and CSS
You need to know a bit of HTML and CSS to modify the index.nginx-debian.html file in a way that the webpage looks as you want. Good tutorials for both languages can be found here: https://www.w3schools.com/. You can also find many HTML/CSS templates in the internet, which you can then adjust.
The typical HTML skeleton looks like this
<!DOCTYPE html>
<html lang="de">

    <head>
        <meta charset="utf-8">
        <title></title>
        <link rel="stylesheet" type="text/css" href="">
    </head>

    <body>

    </body>

</html>- The
<!DOCTYPE html>declaration defines this document to be HTML5. - The
<html>element is the root element of an HTML page. - The
<head>element contains meta information about the document, including the webpage’s title, the character set, any links and scripts, as well as the CSS styles. The latter can be defined internally within the<style></style>tag (so-called internal CSS) or the link of the external CSS stylesheet is provided in the above<link>tag. - The element contains the visible page content so this is what you will mainly modify.
I’d advise to create a new html file outside the terminal with your choice of editor (e.g. I like to use Atom particularly for HTML/CSS). Once the webpage looks the way you want it,
- copy the entire content of your new html page into the clipboard,
- go back to the terminal where you should be still logged into your droplet,
- open the index.nginx-debian.html with the nano editor (see above),
- delete all the content of the file, and
- paste the content of your new html file into the index.nginx-debian.html file.
- Save with
ctrl+Oand ENTER, exit by pressingctrl+X.
If you want to use an external CSS stylesheet you will need to add the link to your stylesheet in the html file and in the /var/www/html/ directory you need to create a new css file with the sudo command, in which you insert your CSS code. To keep everything in one file I went instead for the internal CSS option.
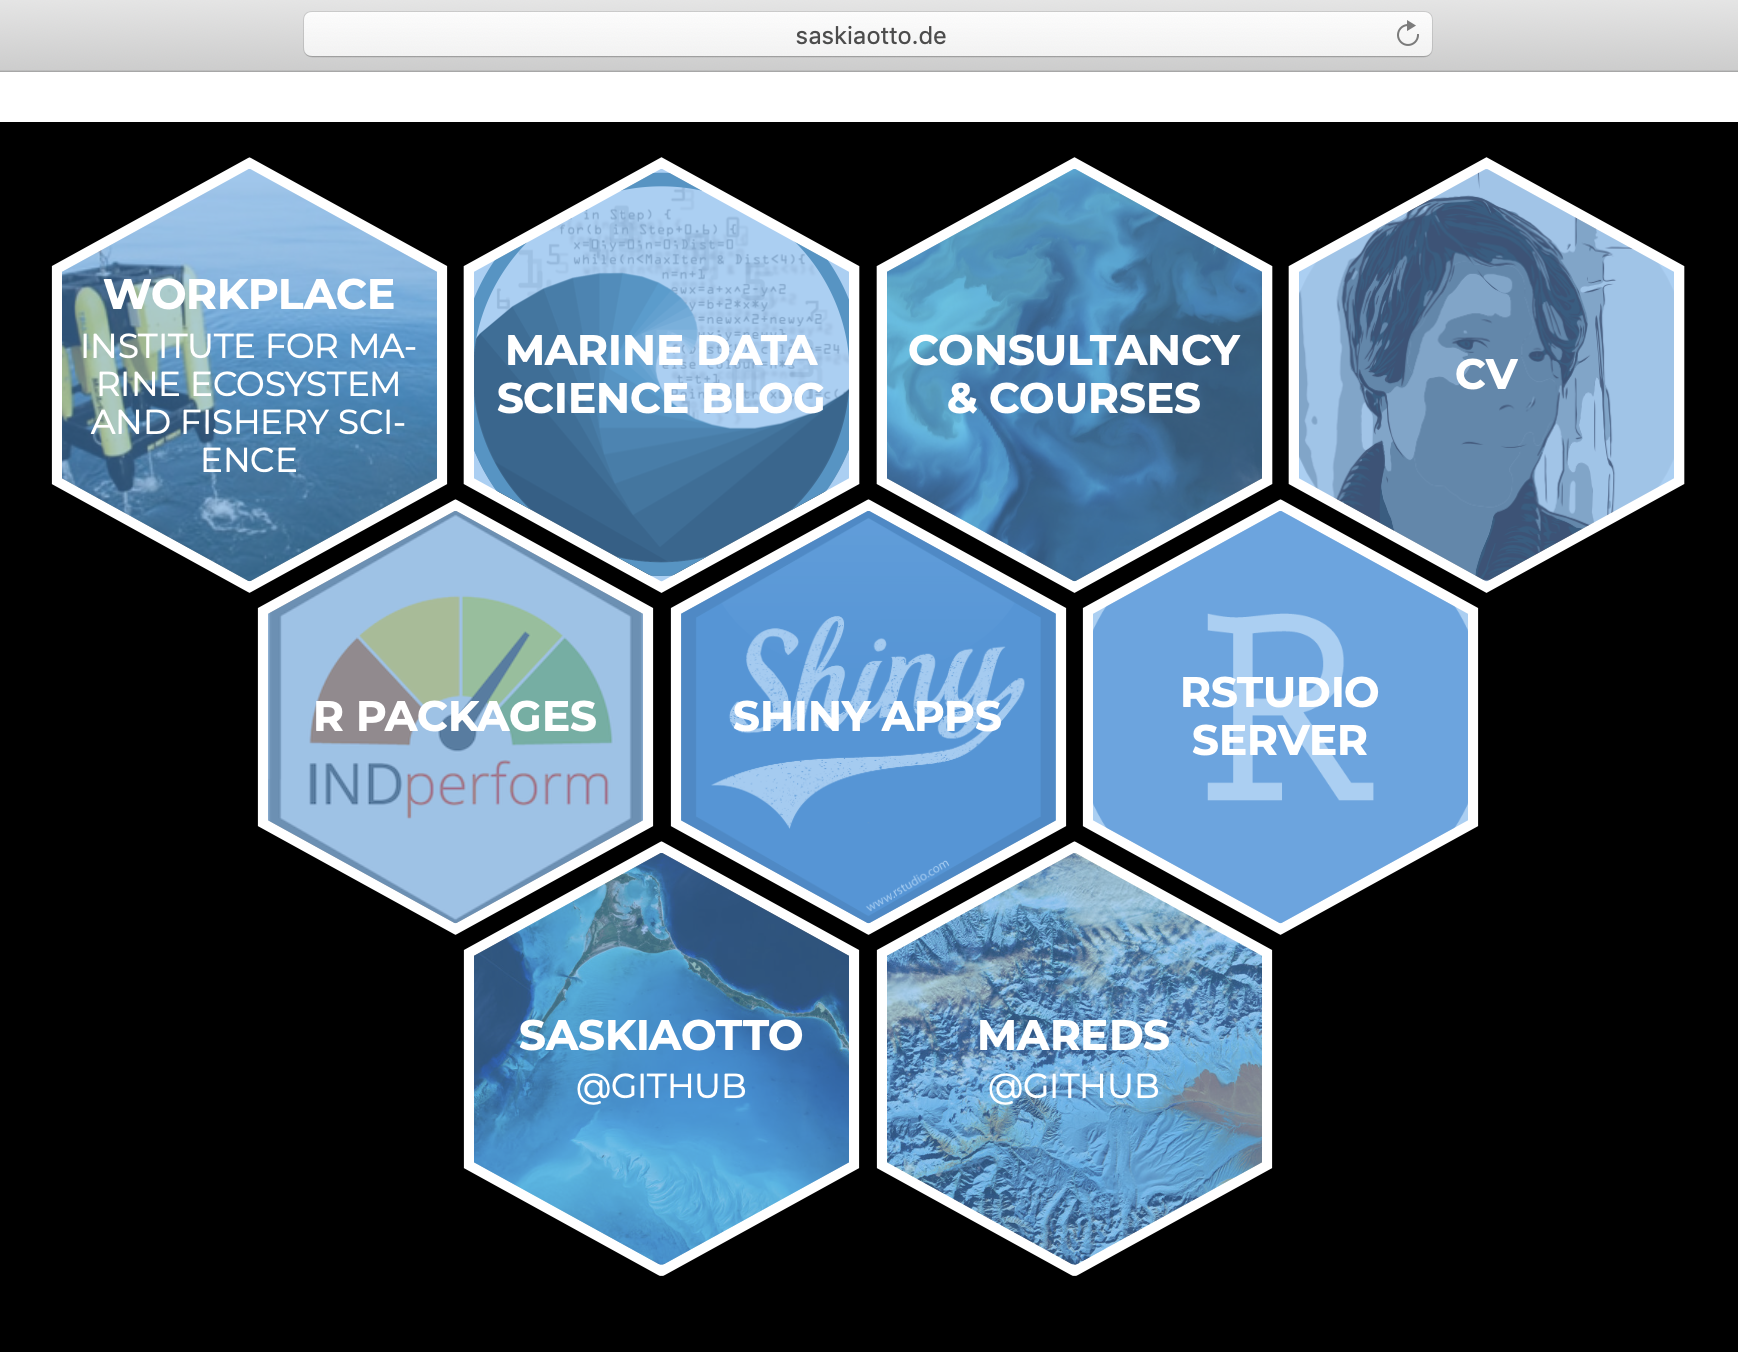
Since the welcome page is pretty static and changes require you to go into the terminal, log into your droplet and edit the file using the sudo command. I’d built a rather simple website that doesn’t require many updates and instead links to other websites:
Step 6: Add a custom domain name (optional)
Instead of using the public IP address that contains so many digits no one will remember, you can also connect your droplet with your web domain. This is pretty simple and requires only 2 steps:
- Get a domain name from any domain name registrar.
- Set up the DNS records for your domain by using a DNS hosting service (which DigitalOcean provides).
For my droplet, I bought the domain saskiaotto.de from 1&1 in Germany. Once the domain was registered I changed the default name servers to the DigitalOcean servers at my domain registrar 1&1. Luckily, DigitalOcean provides for some registrars such as 1&1 detailed tutorials on How To Point to DigitalOcean Nameservers From Common Domain Registrars.
After, I added the domain to my DO account:
- I modified here the A flag where I assigned my domain to the right droplet
- and the CName flag where I allow the www.saskiaotto.de to link to the domain name (without www).
Step 7: Add a SSL certificate to your HTTP to get HTTPS (optional)
Your droplet’s IP address as well as your web domain come with the regular Hypertext Transfer Protocol (HTTP). But the problem with the HTTP protocol is that the information that flows from server to browser is not encrypted, which means it can be easily stolen. HTTPS is basically an HTTP protocol with an additional SSL certificate (the ‘S’ stands for ‘secure’). It encrypts the information that users supply to the site, which basically translates the data into a code. HTTPS is also secured via the TLS (Transport Layer Security) protocol. TLS helps provide authentication, which proves to your users that they are communicating with the intended website, and data integrity and prevents the transfer of data being modified or corrupted.
Browser developers plan to add new warnings for end users when they surf to websites not encrypted with HTTPS, before eventually phasing out HTTP in favor of HTTPS. And cloud computing companies that offer hosting services for static websites (such as netlify where I run this blog) complain about links to web addresses with unsecure HTTP protocol.
So how do you add the SSL certificate to enable encrypted HTTPS on your server?
→ You need to secure nginx with Let’s Encrypt which is a Certificate Authority (CA) that provides an easy way to obtain and install free TLS/SSL certificates. The following instructions are based on this DigitalOcean tutorial: https://www.digitalocean.com/community/tutorials/how-to-secure-nginx-with-let-s-encrypt-on-ubuntu-16-04.
7.1 Install Certbot
Add the repository
$ sudo add-apt-repository ppa:certbot/certbotand press ENTER to accept.
Then, update the package list to pick up the new repository’s package information
$ sudo apt-get updateand install Certbot’s nginx package with apt-get.
$ sudo apt-get install python-certbot-nginx7.2 Modify nginx config file
Before Certbot can configure SSL for nginx, we need to add the domain name in nginx’ configuration file.
Open the Nginx config file default with an editor
$ sudo nano /etc/nginx/sites-available/defaultFind the existing server_name line and replace the underscore, _ (which follows server_name) with your domain name (with and without the www):
...
  server_name example.com www.example.com;
...
Save the file and quit your editor.
Verify the syntax of your configuration edits with
$ sudo nginx -tIf you get any errors, re-open the file and check for typos, then test it again.
Once your configuration’s syntax is correct, reload nginx to load the new configuration.
$ sudo systemctl reload nginx7.3 Allow HTTPS through your firewall
Since we enabled UFW in step 3, we’ll need to adjust the settings to allow also for HTTPS traffic. We do this by replacing the Nginx HTTP with the Nginx Full profile:
$ sudo ufw allow 'Nginx Full'
$ sudo ufw delete allow 'Nginx HTTP'
This should be your status now:
$ sudo ufw status
Status: active

To                         Action      From
--                         ------      ----
OpenSSH                    ALLOW       Anywhere
Nginx Full                 ALLOW       Anywhere
OpenSSH (v6)               ALLOW       Anywhere (v6)
Nginx Full (v6)            ALLOW       Anywhere (v6)
If that’s the case we can install our certificate with certbot in the next step.
7.4 Obtain an SSL Certificate
Run certbot with the --nginx plugin, using the -d flag to specify the names you’d like the certificate to be valid for (which is your domain with and without www):
$ sudo certbot --nginx -d example.com -d www.example.comThe first time you run certbot you will be asked for an email address and your agreement to the terms of service. After doing so, certbot will communicate with the Let’s Encrypt server, then run a challenge to verify that you control the domain you’re requesting a certificate for.
Once that is verified you need to choose the HTTPS settings
Output
Please choose whether or not to redirect HTTP traffic to HTTPS, removing HTTP access.
-------------------------------------------------------------------------------
1: No redirect - Make no further changes to the webserver configuration.
2: Redirect - Make all requests redirect to secure HTTPS access. Choose this for
new sites, or if you're confident your site works on HTTPS. You can undo this
change by editing your web server's configuration.
-------------------------------------------------------------------------------
Select the appropriate number [1-2] then [enter] (press 'c' to cancel):
Select 2 and hit ENTER.
You will receive a message indicating that your certificates are successfully downloaded, installed, and loaded.
If you open your webpage you will see now the https:// at the beginning of your web address. If you test your server using the SSL Labs Server Test, you should get an A grade.
7.5 Verify certbot’s auto-renewal
Before you’re done here you need to test one more thing.
The Let’s Encrypt’s certificates are only valid for ninety days but are automatically renewed by a so-called cron, a time-based job scheduler, which runs twice a day and renews any certificate that’s within thirty days of expiration.
To test the renewal process, do a dry run with certbot:
$ sudo certbot renew --dry-runYou should hopefully receive the following message with no errors
IMPORTANT NOTES:
 - Your account credentials have been saved in your Certbot
   configuration directory at /etc/letsencrypt. You should make a
   secure backup of this folder now. This configuration directory will
   also contain certificates and private keys obtained by Certbot so
   making regular backups of this folder is ideal.
Congratulations! You’re done with the droplet set-up and finally ready to install Shiny and RStudio Server (see Part 2).